If you live in Dubai, chances are your home already has at least one networked security camera, a smart doorbell, an outdoor unit watching the parking bay, or an indoor camera keeping an eye on a child or a pet. Dubai's residential market has embraced smart-home technology faster than almost anywhere else in the world, and security cameras are now as common as a Wi-Fi router. That's genuinely useful. It's also worth understanding what it means from a security standpoint.
Here's the part that surprises most people: a security camera is not just a camera. It is a small computer, running an operating system, connected to your home network, and in most cases talking to a server somewhere on the internet. That makes it as hackable as any other networked device, and in practice, it gets targeted more than most, because the payoff for an attacker is immediate and personal. Access to your camera feed means access to your daily routine, your home's layout, who comes and goes, and when the property is empty.
This isn't a theoretical concern. Researchers and independent security analysts have repeatedly demonstrated that consumer IP cameras, including popular brands sold in malls and online stores across the UAE, can be accessed remotely without the owner's knowledge when basic security steps are skipped. The attack methods range from simply trying default login credentials (which millions of cameras ship with and never have changed) to exploiting unpatched firmware vulnerabilities that manufacturers have known about for months.
Living in a high-density city like Dubai adds a layer of practical relevance. Apartment towers, shared villa compounds, and short-term rental properties all mean that your camera network exists in close physical proximity to other people and other networks. A neighbor's compromised device on a shared building Wi-Fi, or a poorly secured camera in a building's common area, can create pathways that affect your own devices.
This guide covers everything you need to lock down a residential camera system: the hardware you choose, the network it sits on, the accounts you use to manage it, the software keeping it running, how the cameras are physically installed, how your router is configured, and the apps on your phone. Each of these is a real, distinct point of failure. None of them is difficult to address once you know what to look for.
1. Hardware Selection: Choosing Cameras with Built-in Security
The security posture of a camera system is largely determined before you plug it in. The hardware you choose either supports modern security standards or it does not, and retrofitting security onto cheap hardware is difficult.
Look for cameras that support end-to-end encryption (E2EE). This means video data is encrypted on the camera itself and decrypted only on your authorized viewing device. The encryption should use AES-128 or AES-256, both of which are current standards. Manufacturers should state explicitly in their documentation that E2EE is used. If a product page says only "encrypted transmission," that likely refers only to the transport layer (TLS), not the stored or streamed content itself.
Check the firmware update policy before buying. A camera that stops receiving firmware updates becomes a liability. Look for brands with a documented, public track record of releasing security patches. Reputable vendors publish CVE (Common Vulnerabilities and Exposures) notices and their corresponding patches. You can verify this by searching the brand name alongside "CVE" or "security advisory" on sites like the National Vulnerability Database (nvd.nist.gov).
Avoid cameras that require a cloud account just to function. Some devices physically cannot display video without routing it through the manufacturer's servers. This creates a dependency on a third party that you cannot audit. Cameras that support local RTSP (Real Time Streaming Protocol) streaming give you the option to view footage without an external cloud intermediary.
Check for default credential behavior. A camera that ships with a fixed, non-changeable default username and password (such as "admin/admin") represents a known, public vulnerability. Look for cameras that force you to set a unique password during initial setup. This is now a baseline requirement under many national IoT security frameworks, including the UK's PSTI Act, and some manufacturers have adopted it globally.
Avoid cameras with telnet or SSH exposed by default. These are remote management protocols that, if left open, allow command-line access to the device. There is no consumer reason for these to be enabled on a home camera. If you cannot confirm they are disabled, treat the device as higher-risk.
2. Network Security: Isolating Your Cameras from the Rest of Your Network
Most home Wi-Fi networks run all devices, laptops, phones, smart TVs, and cameras on the same network segment. If an attacker compromises one device, they have direct access to everything else on that segment. The solution is network segmentation.
Create a dedicated VLAN for IoT devices. A VLAN (Virtual Local Area Network) is a logically separate network that operates over the same physical hardware. Your cameras, smart bulbs, and other IoT devices go on this VLAN. Your computers and phones stay on a separate VLAN. Even if a camera is compromised, traffic cannot freely cross between VLANs without explicit routing rules, which you control.
This requires a router that supports VLAN configuration. Many mid-range home routers from brands like ASUS, TP-Link (Omada line), Ubiquiti, or Netgate support this. The setup process varies by brand, but the principle is consistent: create a new VLAN, assign it an IP subnet (e.g., 192.168.10.0/24 for IoT vs. 192.168.1.0/24 for your main network), create a corresponding Wi-Fi SSID for that VLAN, and apply firewall rules that block inter-VLAN traffic except for specific, necessary connections.
Use WPA3 encryption on your Wi-Fi networks. WPA3 is the current Wi-Fi security standard. It replaces WPA2, which has a known vulnerability (KRACK — Key Reinstallation Attack) and is susceptible to offline dictionary attacks on captured handshakes. WPA3's Simultaneous Authentication of Equals (SAE) handshake is resistant to these attacks. If your router and cameras both support WPA3, enable it; if either does not, use WPA2-AES (not WPA2-TKIP, which is weaker).
Use a non-descriptive SSID for your IoT network. An SSID (Service Set Identifier) is your Wi-Fi network name. Naming it something like "HomeIoT_Cameras" tells a nearby attacker exactly what devices are connected and roughly what they might find. A generic or random name (e.g., "Network_7F2A") provides no operational information.
Disable SSID broadcast for the IoT VLAN if feasible. A hidden SSID does not appear in the list of available networks. This is a minor deterrent; a determined attacker with a Wi-Fi scanner can still detect it, but it removes the device from casual enumeration. Add cameras manually using the exact SSID name during setup.
Assign static IP addresses to cameras within the IoT VLAN. A DHCP server automatically assigns IP addresses when devices connect. Using static IPs for your cameras means their addresses never change, which makes it straightforward to write precise firewall rules for each device and detect unexpected new devices appearing on the network.
3. Account Protocols: Passwords, 2FA, Session Management, and Storage

Change default credentials immediately. Every IP camera, NVR (Network Video Recorder), and DVR ships with a default username and password. These defaults are publicly documented. Leaving them in place is equivalent to leaving your front door unlocked. Change both the username and the password during initial setup, before the device connects to any external network.
Use a password that is genuinely difficult to crack. A strong password for a camera system should be at least 16 characters and include uppercase letters, lowercase letters, numbers, and symbols. Do not use the device's brand name, your home address, your name, or any word found in a dictionary. A password manager (such as Bitwarden, 1Password, or KeePass) can generate and store these securely. Each camera, NVR, and cloud account should have a unique password.
Enable two-factor authentication (2FA) on every cloud account. 2FA requires a second form of verification, typically a time-based one-time password (TOTP) from an authenticator app in addition to your password. Even if your password is stolen, an attacker cannot log in without the second factor. Use an authenticator app (Google Authenticator, Authy, or Microsoft Authenticator) rather than SMS-based 2FA. SMS codes can be intercepted through SIM-swapping attacks, which have occurred in the UAE and globally.
Review active sessions periodically. Most cloud camera platforms and NVR web interfaces show a list of active logged-in sessions, including the device type, IP address, and login time. Check this list monthly. Any session you do not recognize, particularly from an IP address in a foreign country or an unfamiliar device, should be terminated immediately, followed by a password change and a review of your account recovery information.
Understand the difference between cloud storage and local storage. Cloud storage means your video footage is transmitted over the internet and stored on the manufacturer's servers. Local storage means footage is written to an SD card inside the camera, a hard drive in an NVR, or a NAS (Network Attached Storage) device in your home.
Cloud storage means your footage is controlled and potentially accessible by a third party. That third party's security practices, their response to law enforcement data requests, their risk of a data breach, and their business continuity all become relevant to your privacy. Several major cloud camera providers have experienced breaches in which footage was accessed by unauthorized parties.
Local storage keeps footage physically in your home. The risk is physical theft of the storage device and the absence of off-site backup. A practical middle position: use local storage as primary and encrypted cloud backup as a secondary, so you retain control over the primary copy.
Disable account features you do not use. Many platforms offer guest access, shared viewing links, or third-party app integrations. Each of these is an additional access pathway. If you do not use them, disable them in your account settings.
4. Firmware and Software: Patch Management

Firmware is the operating software embedded in your camera. Security vulnerabilities are regularly discovered in camera firmware, including critical ones that allow remote code execution or credential extraction without authentication. Manufacturers release firmware updates to patch these vulnerabilities.
Enable automatic firmware updates where available. Many modern cameras support automatic update checks. Enable this feature so that critical patches are applied as soon as they are released.
Manually check for updates on devices that do not auto-update. Log in to the camera's administration interface (typically a web browser pointed at its local IP address), navigate to the system or maintenance section, and check the current firmware version. Cross-reference this with the manufacturer's support page to confirm you are running the latest version. Do this at least quarterly.
Subscribe to security advisories from your camera manufacturer. Most major manufacturers (Axis, Hikvision, Dahua, Reolink, Amcrest, Hanwha, etc.) publish security advisories on their websites or via mailing lists. Subscribing means you are notified when a critical vulnerability is found, rather than discovering it after exploitation.
Check the National Vulnerability Database (NVD) for your device. Go to nvd.nist.gov and search for your camera's brand and model number. This database lists known CVEs, their severity scores, and whether patches exist. A CVSS (Common Vulnerability Scoring System) score of 7.0 or above indicates a high-severity vulnerability. If your device has unpatched high-severity CVEs, treat it as compromised until an update is available.
Replace cameras that have reached end-of-life (EOL). Manufacturers eventually stop releasing firmware updates for older products. An EOL camera running outdated firmware with known, unpatched vulnerabilities is a permanent weak point. Check the manufacturer's product lifecycle documentation for your specific model. When a camera reaches EOL, plan its replacement.
5. Physical Security: Preventing Tampering and Reset Attacks
Many IP cameras have a physical reset button that, when held for several seconds, restores the device to its factory default settings, including removing your custom password and re-enabling default credentials. This is a legitimate recovery feature that becomes a security risk on outdoor units accessible to others.
Mount outdoor cameras at a minimum height of 3 meters. At this height, a person cannot reach the reset button or the camera body without a ladder, which introduces time, visibility, and effort as deterrents.
Use tamper-evident hardware. Some cameras ship with tamper detection that triggers an alert if the camera housing is opened or moved. Enable this feature. Physical tamper alerts are logged in the system and can trigger immediate notifications to your phone.
Seal the reset button with epoxy or a security screw cover. For outdoor units in accessible locations, physically blocking the reset button prevents factory reset attacks without requiring any software change. This is an irreversible action on the hardware itself, so confirm your system is correctly configured before doing it.
Secure cabling and power supplies. An outdoor camera with an exposed power cable can be disabled by cutting the cable. Run cables through conduit, inside walls, or through metal protective sleeves. For PoE (Power over Ethernet) cameras, the Ethernet cable provides both power and data, securing both functions simultaneously.
Lock NVR and DVR units in a secured cabinet or room. If an attacker gains physical access to your NVR, they can extract its hard drive directly, bypassing all account and network security. Keep NVRs in a locked cabinet, ideally in an interior room that is not visible from the street or accessible to casual visitors.
6. Router Configuration: Disabling UPnP and Port Forwarding
Disable UPnP on your router. UPnP (Universal Plug and Play) is a protocol that allows devices on your network to automatically open ports on your router to the internet. Camera systems, NVRs, and DVRs frequently use UPnP to make remote viewing convenient. The problem is that UPnP requires no authentication; any device on your network can open any port without your knowledge or approval. Malware on a compromised device can use UPnP to expose internal services to the internet.
To disable UPnP: log in to your router's administration panel (typically at 192.168.1.1 or 192.168.0.1), navigate to the Advanced, WAN, or NAT settings, find the UPnP toggle, and disable it. After disabling UPnP, check your current port forwarding rules and remove any that were created automatically by your camera system.
Remove unnecessary port forwarding rules. Port forwarding creates a permanent, public-facing entry point into a specific device on your network. If your camera or NVR was configured for remote access via port forwarding, traffic arriving at your router on that port goes directly to the device. Every open port is a potential entry point for brute-force login attempts, and camera management ports (commonly TCP 80, 8080, 554, 37777) are scanned by automated bots continuously.
To audit your rules: log in to your router, navigate to the port forwarding or virtual server section, and review every rule. Delete any rule that routes traffic to a camera, DVR, or NVR unless it is an explicit, documented business requirement and the device has strong authentication enabled.
Use a VPN for remote access instead of port forwarding. A VPN (Virtual Private Network) creates an encrypted tunnel from your remote device (phone or laptop) to your home network. Once connected to the VPN, you can access your cameras as if you were physically home, with no public-facing ports required. Most capable home routers support WireGuard or OpenVPN server functionality. WireGuard is the current recommended standard: it is faster, leaner, and more secure than OpenVPN. Setting up a VPN server on your router eliminates the need for port forwarding while maintaining full remote access.
7. Application Privacy: Auditing Mobile App Permissions
The mobile app you use to view your camera feeds requests permissions on your phone. These permissions define what the app can access beyond your camera footage itself.
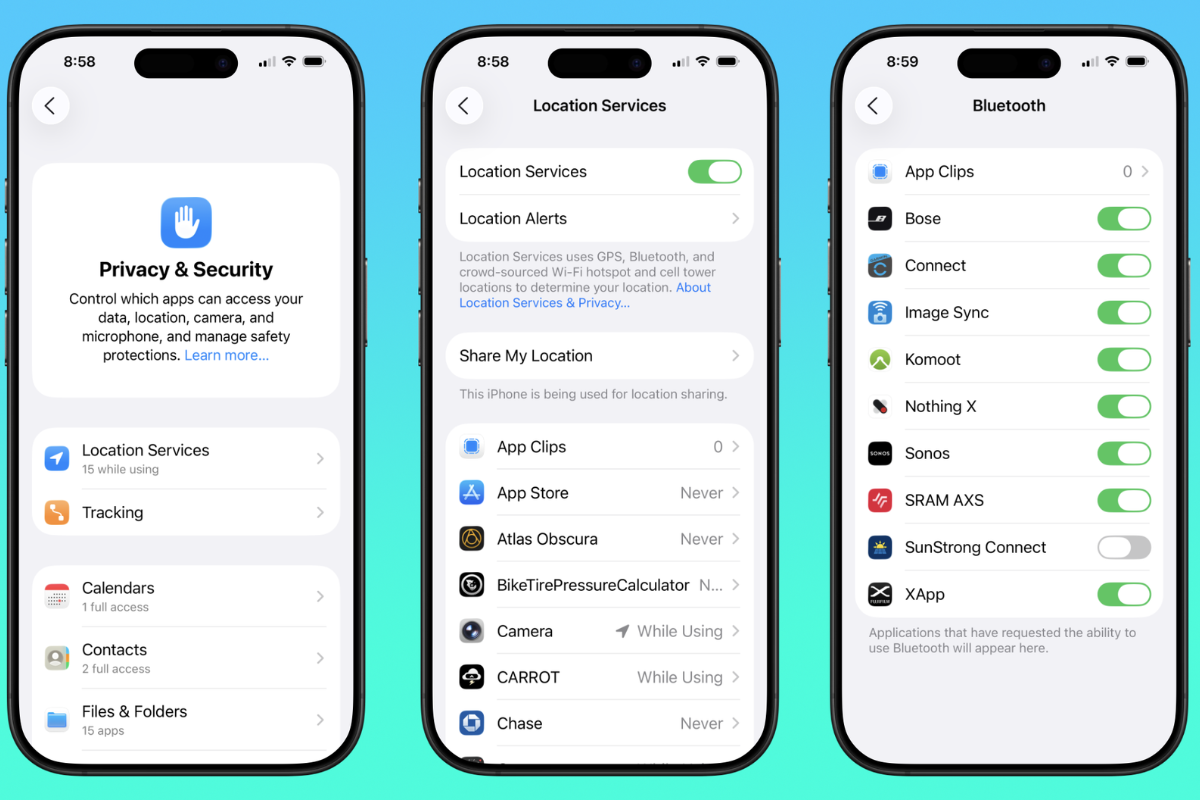
Audit permissions on iOS and Android. On iOS, go to Settings → Privacy & Security and review each permission category (Microphone, Camera, Location, Contacts, Background App Refresh, Local Network). On Android, go to Settings → Apps → [Camera App] → Permissions. For each permission, ask whether it is necessary for the app's core function.
A camera viewing app legitimately needs access to your local network and potentially your phone's camera (for scanning QR codes during setup). It does not need access to your contacts, calendar, or call history. If the app requests permissions that have no plausible connection to its core function, this warrants scrutiny.
Disable background app refresh for the camera app. Background App Refresh allows apps to receive data and update their content when you are not actively using them. For a camera viewing app, this has limited benefit and means the app is regularly communicating with external servers in the background. Disabling it reduces this background data exposure.
Check what data the app sends to third parties. On iOS, App Privacy labels in the App Store list the categories of data the app collects and how that data is linked to you. On Android, the Google Play Data Safety section provides similar information. Review these before installing or after an app update.
Keep the camera app updated. App updates frequently contain security patches. Enable automatic app updates on your device, or check for updates manually at least monthly.
Use separate mobile devices or profiles for security monitoring if practical. If you manage cameras for a property or run a home with multiple occupants, avoid sharing the camera app login across multiple personal devices. Each authorized viewer should have their own account with individually managed access. This makes it straightforward to revoke access for one person without affecting others.
A secure camera system requires ongoing attention, not a one-time setup. Set a quarterly reminder to check firmware updates on all cameras and NVRs, review active account sessions, audit port forwarding rules, and confirm that recordings are being retained correctly. Once a year, check whether any of your devices have reached end-of-life or have unpatched critical CVEs and replace hardware that no longer receives security updates.
Keep a written record of your system: camera locations, firmware versions, assigned IP addresses, VPN settings, and where credentials are stored. This makes audits faster and reduces configuration errors when something changes.
Every measure in this guide addresses a specific, real point of failure. Applied together, they make unauthorized access to your cameras significantly harder, and that is the goal.
Also read: