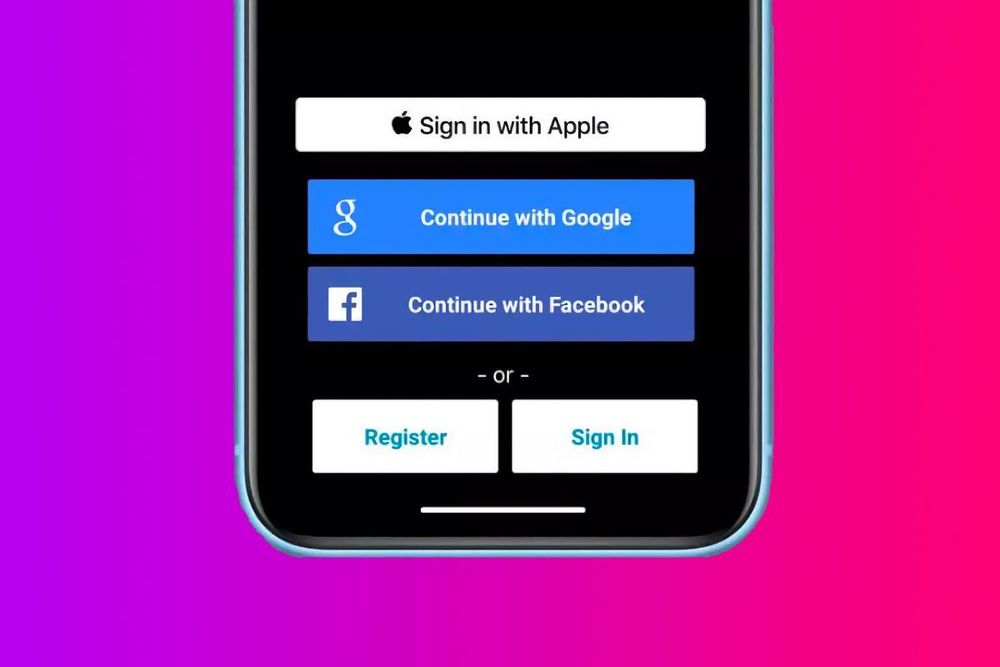
You've seen them competing against each other on websites that require you to log in. "Sign in with Google." No. "Sign in with Facebook." No. "Sign in with Apple." All three big tech companies offer this quick and easy way to register and log in to websites. They are catching on in many apps as well.
While they are easy and convenient to use, these buttons grant websites and apps permission to access certain information from your Google and Facebook accounts. Personal data varies but can include your user name, email address, real name, phone number, and friend lists.
The Sign in with Apple button is a slightly different bird in that you have more control over your data. Apple only grants access to your name and email, but you have the option to use an alias for either. Apple also claims it does not track your usage — Facebook and Google do.
Regardless of the platform, there may be times that you don't want to allow sites and apps access anymore. For example, a website that you signed into one time just to read an article or an app you haven't used in a very long time. They still have access to your data on each service, even if you change it.
Fortunately, you can easily see which sites have permission to access your information and can revoke those permissions whenever you want. Here we'll break down the process for each platform — Facebook, Google, and Apple — since the settings controlling permissions can be a chore to find.
To revoke authentication permissions on Facebook, sign in to your account, then click on your profile picture in the top of the left sidebar. "Select Settings & Privacy" > "Settings."
Scroll down and click "Apps and Websites."
In this section, you will find information about how your data is shared and which apps or websites have access to it. For each entity in the list, you can click the "Remove" button, and it will no longer be able to see any of your Facebook data.
Alternatively, you can hit the "View and Edit" button to see the specific information the website can access and revoke permissions individually when allowed.
Spotify requires access to your name and your profile picture. It also optionally sees your email address, birthday, gender, and friend list.
You can remove permissions from any of these. However, doing so might affect some of Spotify's functionality. For example, it uses your friend list to match you up with other people you know that use Spotify for playlist sharing and such.
So most of the time, it's best to either delete the entire entry or leave it alone, but you can experiment with it to see what data you can safely deny. You can always go back and enable it again.
Google's authentication permissions are also in your account settings. To get to them, go to the Google homepage. Click "Sign in" in the upper-right corner and log into the account you want to edit.
It will return you to the homepage with the sign-in button replaced with your profile picture. Click on that, then select "Manage your Google account."
On the next page, select "Security" from the left sidebar, then scroll down to the section that says, "Signing into other sites." Under that, click "Signing in with Google."
Like Facebook, all apps and websites using your Google profile for authentication are displayed. Clicking on an entry in the list shows the data each site can access. However, you can not remove individual permissions.
You can only revoke permissions entirely with the "Remove Access" button. If you delete an entry, that app can not access your data until you use the Log in with Google button again.
Interestingly, a switch right above the list says it enables/disables the Sign in with Google prompts. However, it appears to do nothing. We tested it and have found that the prompts still work. If you have a better insight into this switch, let us know what it does in the comments.
Apple
We saved Apple for last because there are several ways to accomplish the same task depending on your device.
Windows
If you are on a Windows PC, go to the Apple ID website and log in. In the "Sign-In and Security" section, which should appear by default, click "Sign in with Apple."
Here you'll find a list of apps with access to your data. Like the others, clicking an entry shows you what info the app or website can see. At the bottom of the details is a button to stop using Sign in with Apple for that site.
As mentioned before, Apple's one-click authentication can hide your real name and email using an alias that forwards to your regular account. You will see those listed here. When you revoke permission, using the button again will generate a different alias email. So it's not necessary to remember this information.
Apple Devices
Unlike Windows, Apple devices have native settings for controlling quick authentication.
For Macs, click the Apple on the menu bar > System Preferences > Apple ID > Password & Security.
At the bottom of that section is "Apps using Apple ID." Click the edit button there, and a new window will popup displaying the same list and options you'd find on the Apple ID website.
If you're using an iPhone, iPad, iPod Touch, or Apple Watch, open the Settings app and tap your name. On the next screen, select "Password & Security," then "Apps Using Apple ID."
That will take you to the list of apps with permissions. The process is the same as before; click the website in question and select Stop using Apple ID.
It's worth noting that these sign-in buttons work the same way every time, regardless of the platform. Using one-click authentication will always grant access to your data on that service, even if you have previously revoked it. So doing so is only useful if you never want to use the site or app again or if you want to log in using the traditional method.
News Source: TechSpot